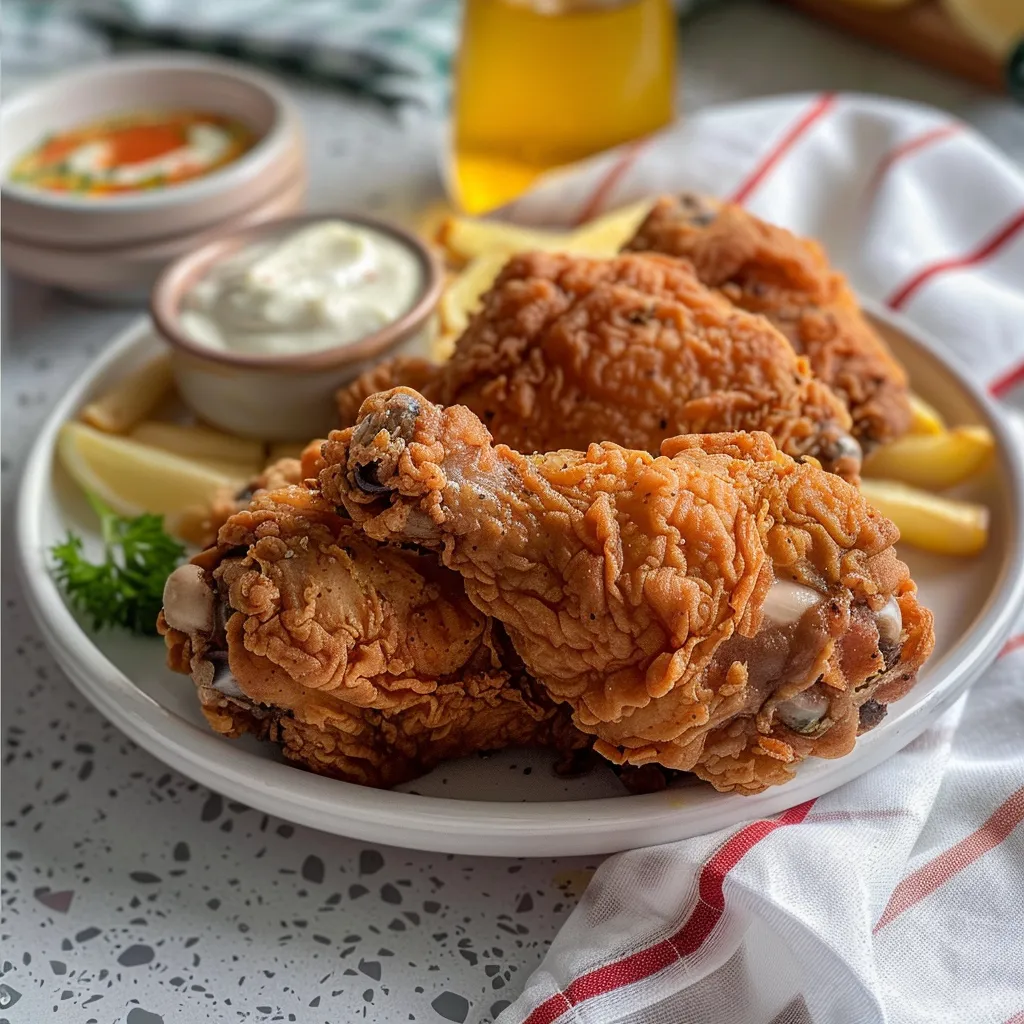
Hey there, fellow food lovers! Are you craving that golden, crispy, finger-licking fried chicken but don’t have buttermilk on hand? Well, you’re in the right place! Today, I’m sharing a game-changing recipe for Fried Chicken without Buttermilk that’s so tender, juicy, and flavorful, you’ll wonder how you ever cooked without it. Whether you’re a busy mom looking for quick family dinners or someone who loves easy pasta recipes (because, let’s face it, who doesn’t?), this dish is perfect for a satisfying 30-minute meal that’s sure to become a staple in your weeknight dinner ideas arsenal.
Why You’ll Love This Recipe
- No buttermilk? No problem! This recipe uses a simple substitute that delivers the same tangy flavor.
- Crispy exterior, tender interior—every bite is perfection.
- Customizable spices let you adjust the flavor to your liking.
- Ready in under 40 minutes, making it a great option for weeknight dinners.
- Kid-friendly and crowd-pleasing—everyone will ask for seconds!
Ingredients
Here’s what you’ll need to make this mouthwatering fried chicken recipe. Don’t worry if you’re missing a few spices—just use what you have on hand!
Full ingredient list with measurements is provided in the printable recipe card below.
How to Make the Recipe
Let’s dive into the step-by-step process. Don’t forget to check out my tips for How to Make Perfectly Crispy Fried Chicken for even more insights!
Step 1: Season the Chicken
Start by seasoning the chicken with salt and pepper. This initial seasoning sets the foundation for that delicious flavor. Let it sit for a few minutes to allow the seasonings to absorb into the meat.
Step 2: Prepare the Egg Wash
Beat the eggs in a bowl until they’re well combined. This egg wash is crucial for creating that golden, crispy coating. If you want to get fancy, you can add a splash of hot sauce for extra flavor!
Step 3: Mix the Flour Coating
In a separate bowl, whisk together the flour, paprika, onion powder, thyme, rosemary, and cayenne pepper. Add a generous pinch of salt and pepper to taste. This mixture is the secret to that irresistible crunch. For more tips on creating the best chicken breading recipe, check out my guide on Best Buttermilk Chicken Recipe.
Step 4: Dredge the Chicken
Coat each piece of chicken in the flour mixture, then dip it in the egg wash, and finally, coat it again in the flour mixture. This double dredging ensures an extra-crispy exterior. For a fun twist, try using a brown paper bag to coat the chicken—it’s a classic trick!
Step 5: Fry the Chicken
Heat about 2 inches of oil in a skillet or saucepot over medium-high heat. Once the oil is hot (around 350°F), add the chicken pieces. Don’t overcrowd the skillet—fry in batches if necessary. Cook for 5 minutes per side, or until the internal temperature reaches 165°F. For more frying tips, head over to my post on How to Make the Best Fried Chicken.
Step 6: Drain and Serve
Once the chicken is golden and cooked through, remove it from the oil and place it on a wire rack to drain any excess oil. Serve warm and enjoy the oohs and aahs from your family!
Pro Tips for Making the Recipe
- Use the right oil: Choose an oil with a high smoke point, like vegetable or peanut oil, for the best results.
- Don’t skip the resting time: Letting the chicken rest after seasoning allows the flavors to meld together.
- Double dredge: Coating the chicken twice ensures an extra-crispy exterior. Trust me, it’s worth the extra step!
- Don’t overcrowd: Fry in batches if necessary. Overcrowding can lower the oil temperature and result in greasy chicken.
How to Serve
Fried chicken is incredibly versatile. Serve it with your favorite sides, like mashed potatoes, coleslaw, or biscuits. For a lighter option, pair it with a fresh green salad. The possibilities are endless!
Make Ahead and Storage
If you want to make this recipe ahead of time, you can season the chicken and prepare the flour mixture up to a day in advance. Store the uncooked chicken in the fridge until you’re ready to fry. For leftovers, store the fried chicken in an airtight container in the fridge for up to 3 days. Reheat it in the oven at 350°F for about 10-15 minutes to restore crispiness.
And there you have it—a simple, delicious recipe for Fried Chicken without Buttermilk that’s sure to become a family favorite. Whether you’re a fried chicken newbie or a seasoned pro, this recipe delivers. So go ahead, give it a try, and let me know how it turns out in the comments below. Happy cooking, and don’t forget to share those crispy, golden pieces with your loved ones!

Fried Chicken without Buttermilk
Ingredients
- 1.5 lb chicken drumstick, or other favorite parts, like legs or wings
- 2 large eggs
- 1 cup all-purpose flour
- Salt and pepper, to taste
- 1 tsp paprika powder
- ½ tsp onion powder
- ½ tsp dried thyme
- ½ tsp dried rosemary
- ¼ tsp cayenne pepper
- Oil, for frying
Instructions
- Season the chicken with salt and pepper and set aside.
- Beat eggs in a bowl.
- Whisk flour, paprika, onion powder, thyme, rosemary, and cayenne pepper in a separate bowl. Add salt and pepper to taste.
- Coat the chicken in flour, then dredge through the eggs, and coat with flour mixture again.
- Heat 2 inches of oil in a skillet. Fry chicken for 5 minutes per side until internal temperature reaches 165°F. Do not overcrowd the skillet.
- Drain chicken on a wire rack and serve warm with sides of choice.